Non-clinical Files Page
If the system contains files that were determined as non-clinical in nature, a "Non-clinical files" link display under the Search button on the
The ability to auto-identify Non-clinical files upon upload is part of the Case Type identification feature that is enabled and configured in Settings. You can also manually change the case type to Non-clinical.
Non-clinical 
R and X Series cases are identified as Non-clinical when the user turns the device on in Monitor or Defib mode to perform a Non-clinical action such as a manual 30J self-test, manually send data, or to access the configuration menu. Other scenarios that create Non-clinical cases include the nightly Automatic Readiness Test, power down case upload - aka "Case Push", and AC Charger mode when the battery is charging. Because these examples of a Non-clinical mode can have case durations anywhere from four seconds to more than 10 min, case identification is based on the contents of the case and the absence of patient impedance.
The Non-clinical identification setting defaults to ON. The following options can be configured in Settings > Case Type Identification:
-
Identify case upon upload: Allows CaseReview to auto-identify X and R Series cases as Non-clinical upon upload - enable/disable.
-
File duration: Sets the amount of time in minutes in which a case will be identified as Non-clinical (default is three minutes). This setting aids in identifying any quick power on/power off cycles where the device was switched on to Monitor, Defib, or Pacer Mode and then turned off without ever attaching to a patient.
-
Auto-removal: Automatically removes cases identified as Non-clinical in X amount of days.
Notes:
-
To see a list of Non-clinical files, go to the Manage Cases page and click the "Non-clinical files" link on the left panel under Search. It's okay if you don't see the link, it only displays if there are Non-clinical files in the system.
-
For easy identification, every Non-clinical case is marked with a special
 icon.
icon. -
You must be a Company Administrator to access the Settings page to change Case Type Identification configuration settings.
See manage Non-clinical cases for more information.
Actions on the Non-clinical Files page
Open a file: Click the Open icon  to see case details.
Sort columns: Click the column head to sort the column rows.
Download/Export: Click the download/export icon  to go to the case's Export page.
Deleting Non-clinical files
Select specific files to delete or delete all the files at once.
Selecting specific files
To delete specific Non-clinical files:
-
Click the case row to highlight it in yellow. You can select one or multiple rows at one time.
-
Click Delete selected row(s).
-
In the confirmation window, click Delete.
What happens next:
-
If you continue, the file(s) you selected will be deleted in 48-hours. The time will be highlighted in red in the "Permanent removal" column.
-
Files that are pending deletion can be restored. After the 48-hour interval, the file is permanently deleted and cannot be restored. In this case, you will need to upload the file again.
-
If you select a row that is already designated for deletion and then click Delete selected row(s), you will be notified that the case will be permanently deleted and cannot be restored.
Delete all files at once
To remove all the Non-clinical files at one time:
-
Click Remove ALL Non-clinical files.
-
You have two options:
-
Remove all the files immediately. This option will permanently delete the files. If you made an error deleting a file, upload the file again.
-
Set a 48 hour timer for the removal. If the files are not restored by 48-hours, they will be permanently deleted.
-
What happens next if you choose a 48-hour timer:
-
The Non-clinical Files page shows two days in the "Permanent removal" column. This time will count down as the 48 hour time limit progresses.
-
Files that are pending deletion can be restored to an active status anytime within the 48-hour interval. After the 48 hour interval expires, the file is permanently deleted and cannot be restored. If the file was deleted in error, you will need to upload the file again.
Auto-delete Non-clinical files
An administrator can turn on a setting that automatically deletes Non-clinical case files after a specified period. If this feature is enabled, the configured number of days will display in the "Permanent removal" column when the Non-clinical file uploads. The number will count down until CaseReview removes the file. You can restore the file anytime before it is deleted. For more information on this setting, see Case Type Identification.
Restoring Non-clinical files designated for deletion
When you restore a file, you remove the pending deletion status and make the case active. An active case will stay in the Non-clinical Files page until it is manually deleted.
To restore a Non-clinical file:
-
On the Manage Cases page, click the Non-clinical files link under the Search button.
-
Click the Action icon
 on the file’s row.
 -
On the confirmation window, click Restore.
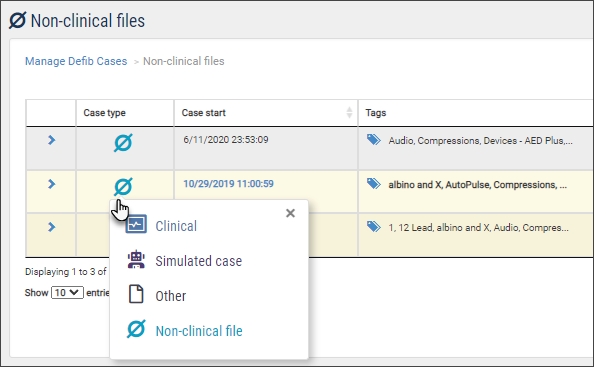
Retyping the Non-clinical identification
For easy identification, every Non-clinical case is marked with a special  icon.
icon.
You can retype a Non-clinical file from the Non-clinical Files page or at the top of any page for this case.
-
Click the
icon. -
Select the new classification from the menu.